

Real-time Dashboard Using Websockets

Introduction
A dashboard is a data visualization and management tool that visually tracks and analyzes the Key Performance Indicators (KPIs), business analytics metrics, infrastructure health and status, and data points for an organization, team, or process. It can be used to present operational and analytical businesWebSockets are one of the most interesting and convenient ways to achieve real-time capabilities in an application. It gives us a lot of flexibility to leverage full-duplex communications. In this blog, we have explored the applications of WebSockets and also created a real-time dashboard service using it which shows how data is handled in real-time.s data with interactive data visualizations to your team.
A real-time dashboard is a dashboard that contains charts that are automatically updated with the most current data available. The typical use case is to load a chart with some historical data first and then live to update it as new data comes in.
WebSocket has become the de facto standard for building real-time dashboards and data visualizations. Unlike traditional dashboards based on periodic polling of databases, WebSockets allows its client to listen to the data coming from servers. That enables the backends to send new data to dashboards at the same time when something happens.
Building Websocket Server for Dashboard
To get a proper understanding of the working of a real-time dashboard let's create a simple WebSocket-based server that keeps track of some elements and updates all active WebSocket connections about the changes in tracked data. For sake of simplicity, we will only keep track of three variables products, orders and customers. For this, we will be using golang library github.com/gorilla/websocket for WebSocket connection and github.com/go-chi/chi for our server.
First, we create a DashboardData structure to store the tracked data.
type DashboardData struct {
    Orders int json:"orders"
    Customers int json:"customers"
    Products in json:"products"
}
For fetching Dashboard data we can use FetchDashboardHelper To fetch complete dashboard data:
func (Dashboard *DashboardData) FetchDashboardHelper() []byte {
    data, err := json.Marshal(Dashboard)
    if err != nil {
        log.Printf("Error: %v", err)
    }
    return data
}
We can add and remove dashboard data, we will be using AddDashboardData(s string) and RemoveDashboardData(s string) error functions:
func (Dashboard *DashboardData) AddDashboardData(s string) {
    switch s {
    case ORDERS:
        Dashboard.Orders++
    case CUSTOMERS:
        Dashboard.Customers++
    case PRODUCTS:
        Dashboard.Products++
    }
    // update presently connected websocket connections about the dashboard changes
    UpdateApi()
}

func (Dashboard *DashboardData) RemoveDashboardData(s string) error {
    switch s {
    case ORDERS:
        if Dashboard.Orders == 0 {
            return fmt.Errorf("no order remains to remove")
        }
        Dashboard.Orders--
    case CUSTOMERS:
        if Dashboard.Customers == 0 {
            return fmt.Errorf("no customer remains to remove")
        }
        Dashboard.Customers--
    case PRODUCTS:
        if Dashboard.Products == 0 {
            return fmt.Errorf("no product remains to remove")
        }
        Dashboard.Products--
    }
    // update presently connected websocket connections about the dashboard changes
    UpdateApi()
    return nil
}
As you can see in from the above code apart from updating dashboard data we are also sending data on a channel, it is so that we can change the updated channel to all the WebSocket connections currently connected to the server.
Below is the UpdateApi() to notify currently connected WebSocket connection:
// stores all the channels used by each connected websockets
var ChannelMap map[*websocket.Conn]chan int
// Updates all the channels which are stored in ChannelMap
func UpdateApi() {
    for _, element := range ChannelMap {
        element <- 1
    }
}
Below are the add and delete API handlers we are using to update the dashboard:
func AddOrder(w http.ResponseWriter, r *http.Request) {
    dashboard.AddDashboardData(ORDERS)
    _, err := w.Write([]byte("Order Added"))
    if err != nil {
        return
    }
    return
}

func AddCustomer(w http.ResponseWriter, r *http.Request) {
    dashboard.AddDashboardData(CUSTOMERS)
    _, err := w.Write([]byte("Customer Added"))
    if err != nil {
        return
    }
    return
}

func AddProducts(w http.ResponseWriter, r *http.Request) {
    dashboard.AddDashboardData(PRODUCTS)
    _, err := w.Write([]byte("Product Added"))
    if err != nil {
        return
    }
    return
}

func RemoveOrder(w http.ResponseWriter, r *http.Request) {
    err := dashboard.RemoveDashboardData(ORDERS)
    if err != nil {
        w.WriteHeader(http.StatusBadRequest)
        return
    }
    _, err = w.Write([]byte("Order Removed"))
    if err != nil {
        return
    }
    return
}

func RemoveCustomer(w http.ResponseWriter, r *http.Request) {
    err := dashboard.RemoveDashboardData(CUSTOMERS)
    if err != nil {
        w.WriteHeader(http.StatusBadRequest)
        return
    }
    _, err = w.Write([]byte("Customer Removed"))
    if err != nil {
        return
    }
    return
}

func RemoveProducts(w http.ResponseWriter, r *http.Request) {
    err := dashboard.RemoveDashboardData(PRODUCTS)
    if err != nil {
        w.WriteHeader(http.StatusBadRequest)
        return
    }
    _, err = w.Write([]byte("Product Removed"))
    if err != nil {
        return
    }
    return
}
Now, we have all the required handlers we will be needing for our Dashboard. Now we need to create a dashboard handler which connects to the user and sends information every time data gets updated. For this, we will be using WebSockets so that we can maintain a connection with the user and can update the dashboard in real-time.
func DashboardHandler(w http.ResponseWriter, r *http.Request) {
    update := make(chan int, 1)
    upgrades.CheckOrigin = func(r *http.Request) bool { return true }
    conn, err := upgrades.Upgrade(w, r, nil)
    if err != nil {
        w.WriteHeader(http.StatusInternalServerError)
        return
    }
    defer conn.Close()
    var data []byte
    data = dashboard.FetchDashboardHelper()
    conn.WriteMessage(1, data)
    // storing update channel to map to get update notification
    ChannelMap[conn] = update

    func(conn *websocket.Conn, update chan int) {
        for {
            // Pause the code flow untill we get channel information
            <-update
            data = dashboard.FetchDashboardHelper()
            conn.WriteMessage(1, data)
        }
    }(conn, ChannelMap[conn])
// deleting channel once connection is closed
    delete(ChannelMap,conn)
    return
}
Below is the main() the function we used:
   var dashboard DashboardData // structure to store dashboard data

    func main() {
        fmt.Println("Starting Server...")
        update = make(chan int)
        router := chi.NewRouter()
        router.Route("/", func(ws chi.Router) {
            ws.Get("/dashboard", DashboardHandler)
            ws.Post("/sign-up", AddCustomer)
            ws.Post("/order", AddOrder)
            ws.Post("/product", AddProducts)
            ws.Delete("/order", RemoveOrder)
            ws.Delete("/product", RemoveProducts)
            ws.Delete("/sign-off", RemoveCustomer)
        })
        log.Fatal(http.ListenAndServe(":8082", router))
    }
As we run the above code our server will be hosted on localhost:8082. Below is the Postman snippet and Demo video of our Dashboard :
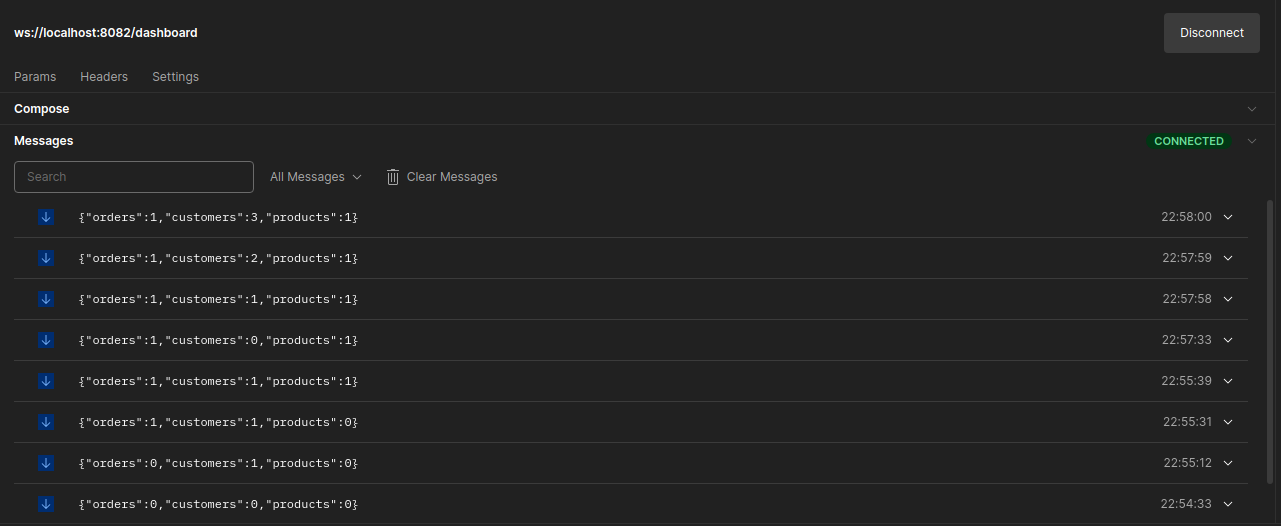
As we can see from the above video user connected to the server via WebSocket will get updated dashboard data with every change it will receive. Hence, the user is getting updated in real-time.
We have attached a link to our demo code repository, to start the server code just go to the directory in this case RealTimeDashboardUsingWebsockets then run the command go run main.go once we have successfully started the server we need to run the dashboard UI. To run the Dashboard UI we can use the command npm start at the DashboardUI directory. When we hit the POST and DELETE API our dashboard will get updated consecutively.
Conclusion
WebSockets are one of the most interesting and convenient ways to achieve real-time capabilities in an application. It gives us a lot of flexibility to leverage full-duplex communications. In this blog, we have explored the applications of WebSockets and also created a real-time dashboard service using it which shows how data is handled in real-time.
Below is the GitHub link for the aforementioned implementation: Real-Time-Dashboard-Using-Websockets


