

Lightweight Docker Images. Why And How ?
You might be wondering how a Docker image can be larger than a gigabyte. When you take a standard Golang application and package it using a base image that comes with everything, you will surely cross the 1 GB threshold.
Why We Need Smaller Containers
Before learning how to create smaller docker images we should know why we are doing that.
Some Benefits of creating smaller containers
- Less pull time.
- Less push time.
- More Secured.
When we build, push or pull docker images, smaller containers has no significant difference for powerful computers or Container Builder, but significant difference for smaller computers and shared systems (like many CI/CD systems). Small Images are always better in terms of absolute performance.
Aside from performance, there are significant security benefits from using smaller containers. Small containers usually have a smaller attack surface as compared to containers that use large base images.
Let's take an example of Hello World GoLang Application docker image from base Golang image.
GoLang Hello-World Application
package main

import "fmt"

func main() {
    fmt.Println("hello world")
}
Basic Docker Image
dockerfile
FROM golang:1.16

WORKDIR /go/src/app
COPY . .
RUN go install -v ./...
ENTRYPOINT ["app"]
Run
docker build -t bigimage .
Final Result

864MB just for an empty image … this is too much
There is lightweight Alpine Docker image for Go. Check the Alpine linux page for more informations.
This is smaller than the base golang image but still quite large for production environment.
Let's use the Apline GoLang image.
Golang Alpine Docker Image
dockerfile
FROM golang:1.16.6-alpine3.14
RUN apk update && apk add --no-cache git ca-certificates && update-ca-certificates
WORKDIR /go/src/app
COPY . .
RUN go install -v ./...
ENTRYPOINT ["app"]
Run
docker build -t alpineimage .
Let's check the Results now

Now we get the 319 MB image by changing the base image to lightweigt alpine version. Which is quite a success but can we make it smaller? Answer is yes!!
Use Multi-stage builds
All Thanks to docker multi-stage builds, we can build our application in a docker alpine image and produce a small image with only a binary in a scratch image.
For More information on multi-stage-builds.
OK, it’s time to build a smaller image with multi-stage build Before that we gonna see docker scratch image, a Zero Bytes image. Perfect for embedding our go static binary.
Using Multi-Stage Build
############################
# STEP 1 build executable binary
############################
FROM golang:1.16.6-alpine3.14 AS builder
RUN apk update && apk add --no-cache git ca-certificates && update-ca-certificates
WORKDIR /go/src/app
COPY . .
# Build the binary.
RUN CGO_ENABLED=0 GOOS=linux GOARCH=amd64 go build -a -installsuffix cgo -o /go/bin/app

############################
# STEP 2 build a small image
############################
FROM scratch
# Copy our static executable.
COPY --from=builder /go/bin/app /go/bin/app
# Run the hello binary.
ENTRYPOINT ["/go/bin/app"]
Result

Nice!! only 1.94MB with everything.
It is a simple Hello-World application but in real production environment this image can expand upto few more MBs.
Few more tips on smaller-images
1. Use Fewer Layers
You may have noticed that most of the Dockerfiles in the wild have some weird tricks like this:
FROM golang:1.16.6-alpine3.14 AS builder
RUN apk update && apk add --no-cache git ca-certificates && update-ca-certificates
We also use this && when we build our Hello-World docker image.
Why the &&? Why not running two RUN statements like this?
FROM golang:1.16.6-alpine3.14 AS builder
RUN apk update
RUN apk add --no-cache git ca-certificates
RUN update-ca-certificates
Since Docker 1.10 the COPY, ADD and RUN statements add a new layer to your image. The previous example created 3 layers instead of just one.
Layers are like git commits.
Docker layers store the difference between the previous and the current version of the image. And like git commits they're handy if you share them with other repositories or images. In fact, when you request an image from a registry you download only the layers that you don't own already. This way is much more efficient to share images. But layers aren't free. Layers use space, and the more layers you have, the heavier the final image is. Git repositories are similar in this respect. The size of your repository increases with the number of layers because Git has to store all the changes between commits. One of the first things you learn when building your Docker images is that you should squash multiple Docker layers into one big layer.
Let’s take a look at the following Dockerfile, and demonstrate why it’s better to use fewer layers in a Docker image:
FROM ubuntu:14.04

RUN apt-get update -y

# Install packages
RUN apt-get install -y curl
RUN apt-get install -y postgresql
RUN apt-get install -y postgresql-client

# Remove apt cache to make the image smaller
RUN rm -rf /var/lib/apt/lists/*

CMD bash
Result

When we build the image with docker build -t my-image ., we get an image that is 273 MB in size. With docker history my-image we can list the layers of our Docker image:
For detailed information you can run docker history $image-name command. I will show you the memory each step takes.
Run: docker history ubuntuimage
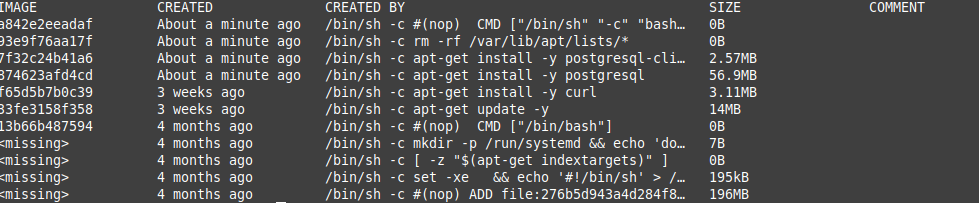
When working with Docker, we need to keep in mind that any layer added to the image is never removed. In other words, it’s smarter to update the apt cache, install some packages, and remove the cache in a single Docker RUN command.
Let’s see if we can reduce the size of our image with this technique:
FROM ubuntu:14.04

RUN apt-get update -y && \
    apt-get install -y curl postgresql postgresql-client && \
    rm -rf /var/lib/apt/lists/*

CMD bash
Nice! After the successful build, the size of our image dropped to 250 megabytes. We’ve just reduced the size by 25 MB just by joining the installation commands in our Dockerfile.
2. Use Docker Cache Effectively
When creating your first Docker image, the most obvious choice is to use the same commands you would use in your development environment.
For example, if you’re working on a GoLang project, you would probably want to use the following:
FROM golang:1.16.6-alpine3.14 AS builder
RUN apk update && apk add --no-cache git ca-certificates && update-ca-certificates
WORKDIR $GOPATH/src/github.com/app/
ENV GO111MODULE=on
COPY . .
RUN go mod download
RUN CGO_ENABLED=0 GOOS=linux GOARCH=amd64 go build -a -installsuffix cgo -o /go/bin/app
ENTRYPOINT ["/go/bin/app"]
However, by doing this, you will effectively wipe every cached layer, and start from scratch on every build.
We can easily cache the go mod vendor step here.
Let's take an example of following Golang docker file
FROM golang:1.16.6-alpine3.14 AS builder
RUN apk update && apk add --no-cache git ca-certificates && update-ca-certificates
WORKDIR $GOPATH/src/github.com/app/
ENV GO111MODULE=on
COPY go.mod .
COPY go.sum .

RUN go mod download
COPY . .
RUN CGO_ENABLED=0 GOOS=linux GOARCH=amd64 go build -a -installsuffix cgo -o /go/bin/app
ENTRYPOINT ["/go/bin/app"]
With the above technique, you can shorten the build time of your image and reduce the number of layers that need to be uploaded on every deploy.
Conclusion
- Use smaller images like
alpine. - Use multi-stage builds for smaller images.
- Use
less layerswhile creating docker files. - Smaller containers are effective in performance
- Smaller containers are secured.
- Docker is great!
visit our next post of the series managing-environment-with-golang


